Flavoring for Multiple Environments in a Flutter App: Use Different Firebase projects for dev, staging and production environment
I have recently published at app to playstore and face a problem for managing crashlytics, events and Different Api Endpoints for different environments. I have to manually change the base URL for production every time I build the app for production.
But when we want to see the user events and Crashlytics whether it comes from production app or the development app I am working on or the staging environment. Here comes the concept of app flavoring. I have seen some packages for this but I am not quite satisfied or clear about their examples/documentations. So I decided to do it in android side for my use case and I found it pretty easy and understandable to achieve flavoring in my app.
Currently I am focusing on android side in this article.
Setting Up Flutter Flavors
Step 1: Configure Flavors in Android
- Open the
android/app/build.gradlefile. - Modify the
androidblock to include product flavors(You can specify as many as u want):
android {
    ... //Rest of your code
    productFlavors {
        dev {
            dimension "env"
            applicationId "com.example.dev"
            versionNameSuffix "-dev"
            resValue "string", "app_name", "TestApp Dev" //This will indicate your app name
        }
        staging {
            dimension "env"
            applicationId "com.example.staging"
            versionNameSuffix "-staging"
            resValue "string", "app_name", "TestApp Staging"
        }
        prod {
            dimension "env"
            applicationId "com.example"
            versionNameSuffix "-prod"
            resValue "string", "app_name", "TestApp Prod"
        }
    }
}
This will be the android side configurations to get different apps for different environments.
Step 2: Configure Flutter Side
Now comes to dart side. we will setup the firebase later.
You can create different entry points(main.dart file) for different environments. e.g.
main_dev.dartmain_staging.dartmain_prod.dart
But in this article, I will only use one main.dart file and check environment and make decisions accordingly.
You can check the environment with just single line of code like:
const String flavor = String.fromEnvironment('FLAVOR');Call this line anywhere in your code and check your current environment. Value used in String.fromEnvironment() method as “FLAVOR” here will be passed from the launch settings or flutter run command.
Step 3: Setup Launch Settings:
From this you will be good to go with the different flavors and make your configurations work as per your requirements. You can run your flutter app from command panel or setup your launch settings in your launch.json file inside .vscode folder so you can debug efficiently using vscode run methods. Here we will discuss both.
i) From terminal:
flutter run --flavor dev -t lib/main.dart --dart-define=FLAVOR=devHere you can see we are running the flavor dev targeting our main.dart file and setting the FLAVOR variable as dev which I have mentioned earlier.
ii) Running from IDE (VSCode):
VS Code uses a launch.json file to configure how the app is run. You can define multiple configurations for different flavors.
- Open VS Code.
- In the Explorer panel, go to the
.vscodefolder (if it doesn’t exist, create it). - Inside
.vscode, create or edit thelaunch.jsonfile. - Add configurations for each flavor you want to run (e.g.,
dev,staging,prod).
Here is the example Code:
{
  // Use IntelliSense to learn about possible attributes.
  // Hover to view descriptions of existing attributes.
  // For more information, visit: https://go.microsoft.com/fwlink/?linkid=830387
  "version": "0.2.0",
  "configurations": [
    {
      "name": "Flutter Dev",
      "request": "launch",
      "type": "dart",
      "program": "lib/main.dart", // Entry point for the dev flavor
      "args": [
        "--flavor", "dev",
        "--dart-define=FLAVOR=dev"
      ]
    },
    {
      "name": "Flutter Staging",
      "request": "launch",
      "type": "dart",
      "program": "lib/main.dart", // You can change this to your filename if you are using different files
      "args": [
        "--flavor", "staging"
      ]
    },
    {
      "name": "Flutter Prod",
      "request": "launch",
      "type": "dart",
      "program": "lib/main.dart", // You can change this to your filename if you are using different files
      "args": [
        "--flavor", "prod",
        "--dart-define=FLAVOR=prod"
      ]
    }
  ]
}
Yeah, we are done with flavoring and it should work perfectly. you can get the values of FLAVOR variable and use in your app whenever needed. It will target to different apps with different bundle IDs installing different apps on single phone for different environments.
But our main concern is to target different firebase projects to track user’s behavior, events and crash reports.
Step 4: Configuring Firebase for Different Flavors
Using Firebase with multiple flavors requires some extra steps:
i) Create Firebase Projects
- Create separate Firebase projects for each flavor in the Firebase Console.
- Register the apps with the corresponding package names (e.g.,
com.example.devfor development environment andcom.example.dfor production).
ii) Download Configuration Files
After registering your apps, download the google-services.json (for Android) for each project and place them in the appropriate flavor directories(Create seperate folder for each flavor with the flavor name inside android/app/src):
android/app/src/dev/google-services.json
android/app/src/staging/google-services.json
android/app/src/prod/google-services.json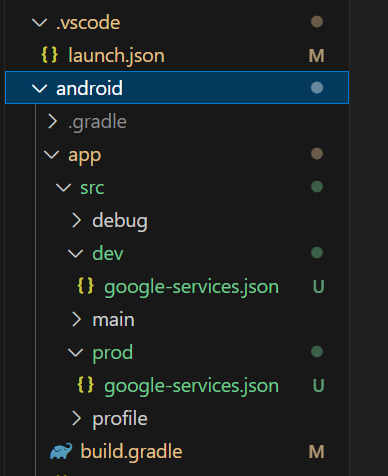
Here you can see that inside android/app/src directory, I have dev and prod folders as per my names of flavors I used in build.gradle file. (I have skipped the staging folder here because I was not using this environment)
Make sure to setup the firebase in your project according to the documentation of firebase.
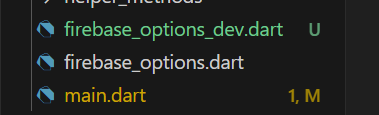
If you are using flutterfire cli, you can generate the copy of firebase_options.dart as firebase_options_dev.dart and firebase_options_staging.dart file for your environment and change the values of your firebase configurations from the respective firebase project.
iii) Setup Flutter and Initialize Firebase
Import the dev firebase options in your main.dart file and read the value of our FLAVOR variable.
import 'firebase_options_dev.dart' as devOptions;

const String flavor = String.fromEnvironment('FLAVOR');
You can skip the read and defining of FLAVOR variable if you are using different launch files for every environment. I am using the same file and initializing the firebase based on environment.
Now its time to initialize the firebase project based on environment. For example.
void main() async {
  WidgetsFlutterBinding.ensureInitialized();
  FirebaseOptions? options;
  if (flavor == 'dev') {
    options = devOptions.DefaultFirebaseOptions.currentPlatform;
  } else {
    options = DefaultFirebaseOptions.currentPlatform;
  }
  await Firebase.initializeApp(
      options: options,
  );
  //Test Crash
  // You need to setup crashlytics in your project if not already configured
  FirebaseCrashlytics.instance.crash();
  runApp(MyApp());
}
This is it. We did it.
iv) Testing Different Flavors
Run your app for different flavors and observe the output to verify the correct configurations are being applied.
Conclusion
By leveraging Flutter’s flavors and environment variables, you can efficiently manage multiple configurations for your app, making your development process smoother and more organized. Whether you’re working on Firebase setup, API endpoints, or any other environment-specific configurations, this approach will help you keep everything in order.
Feel free to customize and expand upon these steps based on your specific needs and use cases. Happy coding!
I hope this helps you. If you find this article helpful, like it and do follow me for more flutter related content.